Showing posts with label Linux. Show all posts

Wednesday, April 21, 2010

Mercurial


Sometimes you miss up your code with some changes that cause it not to work and you are unable to remember what you did or even worse not able to recover what you deleted, that's way their is something called Source Control, this helps you keep different versions of your projects, so you can just move between them without losing any thing, there are many stuff that do Source Control like cvs or svn, any way I came across something called Mercurial which seemed a nice thing to write about.
The guide is really good and simple, but I am gonna explain things little bit more and with some examples.

Installation

You can install Mercurial easily by typing sudo apt-get install mercurial in your terminal if you don't already have it, you also need to create a file name .hgrc in your home directory, Mercurial uses this file as your preferences, so you type your user name, and your preferred editor (ex. nano, vim or emacs).
my .hgrc file looks like this

[ui]
editor = nano
username = Khaled Hady

Creating a Repository

The first thing we need to do is to create a repository which is like telling Mercurial this folder is where I work and I want you to keep tracking any changes that I do.
If you already have a folder where your projects are then you will write two commands, let's say that my project is in a folder called Test in my home directory, and I have only one file "main.c" in it, that I want to keep track of.


I used cd to go to Test folder, then I used hg init to initiate a repository. I typed hg add because I want ALL the files to be tracked, if you want only some files to be tracked use
$ hg add first.c third.c
where first.c and third.c are the files you want to keep track of.
I also used the hg status command to know which files I am following and which I am not.


I used the nano command to edit the main file by adding few lines, then I added a new source file named newFile.c


After that I use hg diff to show the differences between the current version and the data in the files I am tracking, it tells me that there have been changes, so I type hg commit to make a new version that maintains the changes I made, and I am asked to type a comment which is important so I can keep track of my changes.


Now accidently, I changed the "newFile.c" and wrote some stupid code, then I commited the version so now I have two versions (0 and 1), I want my old version back (version 0)


first I will type hg log to see what each commit did in the project (so you must write reasonable words when you write the comment of the commit), then I will type hg update 0, I typed 0 cause I want to go to the first version which is zero, also you can use hg update tip to go to the latest version whatever it is.

Now the files are the same in version 0.


there is also a command called hg identify -n which tells you on which version you are now, if it has the form [num]+ (ex. 3+) this means you made changes to the version number 3 but hasn't commited these changes.


That's for now, there are other commands that we can talk about later.

Wednesday, January 27, 2010

Clean Your Grub !!


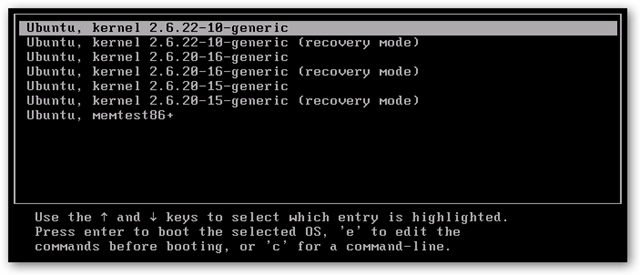
If you are an Linux user, you must be familiar with the kernel updates (especially when you download a cut edge version), those updates are important and surely we do them, but the problem shows up when you find your grub full of kernels ( a kernel version + recovery), this happened to me I had 4 kernels with 4 recovery and another memory check, add to that I have Windows 7, so actually I had 10 items in my grub menu which makes it looks like a start menu :D, so I searched for a way to solve that problem, and I found this link ... it's very good, I tried it my self and removed two kernels and left two for safety, just follow the instructions but be careful coz you are missing with your kernel here!!

Sunday, November 8, 2009

Mounting Volumes through terminal


In Linux operating systems, partitions of your hard drive are not mounted when you start, you can mount them easily through the normal file manager, anyway this way is not convenient, let's say that I want to open a recent document in Open Office but I forgot to mount the volume where this file exists, this will cause a file not found error to appear. Another thing that mounting volumes in different order causes different paths, so you have to mount volumes every time you start up and in the same order.

Sorry for so much talking, anyway thanks to shell scripts. you can write few lines to mount all volumes for you.

We will see how to do this:

1 - As you should know, every hardware is represented by a file in Linux file system in the folder /dev , so the first thing we need to do is to know the names of the volumes we are going to mount. We can do this by typing this in the terminal.

sudo fdisk -l


This will show us the partitions, their spaces and their names (sda1, sda2, ...)


2 - Let's say I want to mount the partitions sda1, sda5 and sda7, before I call the mount command I must create a mount point which is a folder under the /media folder in the file system. Through this file I will access the contents of the partition.

3 - We will create the folder using
sudo mkdir /media/anyname


4 - I will mount the partition using
sudo mount /dev/sda1 /media/anyname
Note: Partitions that are mounted through terminal must be unmounted through terminal, so if you want to unmount a partition use
sudo umount /media/anyname


It's better if you delete the mount point using
sudo rmdir /media/anyname

These attached files contain the shell script that I wrote to mount and unmount volumes, of course you will change the names of the partitions (sda#) and make them executable using the chmod command.


Tuesday, October 27, 2009

Installing Qt on My Ubuntu


This week we are assigned to create a simple drawing program using C++, there are different libraries that you can use to develop GUI using C++, any way my friend Abolnour (our open source godfather) advised me to use Qt which is an open source library that enables you to write GUI programs in C++.

The installation process is easy, you have to go to this download page, then choose the LGPL/Free and choose your platform (I chose Linux 32 bit because I am trying to avoid my Vista :D). it's safer and better to dowload the whole SDK whic includes and IDE called Qt-Creator that you can use to create your applications.

After you finish downloading the file (275.4 MB in our case), you will use two lines in the terminal to install every thing.

1 - Navigate to the directory where you downloaded the file using cd

cd /media/disk/Downloads


that's for me (the path will be different for you)

2 - use the command

chmod u+x qt-sdk-linux-x86-opensource-2009.04.1.bin


which makes the file executable.


3 - use the command

./qt-sdk-linux-x86-opensource-2009.04.1.bin


which will run you an installation wizard that asks you where you want to install the Qt-creator
and the libraries.

After that you can use will find the Qt-Creator in the Applications --> Programming, you can use
this tutorial to learn the Qt.

Any way, you may face the silly error I faced when I tried to build a project
the error is
collect2: ld returned 1 exit status
After really turning the Internet upside down, I found that you have to install an extra package using this command

sudo apt-get install libqt4-dev

By the way, the best thing about Qt that it's platform independent although you write it with C++, there is something else
called GTK that you can use.

that's all enjoy Qt !!


Sunday, October 18, 2009

Linux got it all


Many Claim that Linux distributions have very little when it comes to the cool look, well this is absolutely wrong simply because Linux gives you better look than any one else (I mean ... :D). Just check this site it is really great, it contains a huge number of cool looking themes, backgrounds, screen savers, splash screen, screenlets and even more that work on Gnome Desktop. I am sure you can find something for KDE.

Not covinced yet !!! why not use the fancy "compiz" tool, this tool enables you to literaly "Play" with your Desktop, use the Cube to jump between desktops, fire effect and other great things. After you download it from this page, you will find it in System --> Prefrences, you can configure it there to enable the features you need, and you will find the shortcut keys here.

The best thing that normally all of this stuff is for free, safe and easy download like all Free and Open Source products.
ENJOY !